I spent the night at the airport Monday night, waiting for my Tuesday morning flight back to Phoenix... just finished working the Toronto-Beijing flight.. Couldn't sleep properly, so I figured I should do some research on materials I use.
I'm not one of those that mass produces dolls for sale. I take private orders and make each one unique and specific to the buyer's requests. And so I like to purchase materials from sellers much like myself.. not some big company, but more of private sales.
For eyes, there are two types I use (aside from buttons).. the sewn-on bead type and safety eyes. Depending on who the doll is for, I choose my eyes differently.. especially if it is for a little kid or baby - I will definitely use safety eyes so it won't come out at any time. The two sellers I purchase from are 6060 and GlassEyesOnline. Love their items and it's always a pleasure doing business with them.
Gonna leave it here for now... and watch some Stargate Atlantis... hehehe... and then continue with polyester-fill stuffing later!
Thursday, December 9, 2010

Wednesday, December 8, 2010
Wave your fortune this way Kitty!
I promised my friend a kitty cat as a little gift for her.... another doll to practice more stitching and molding the stuffing. I have very odd things I do about making the stuffing smooth after inserting into the sock. First of all, you want the stuffing to evenly distribute in the sock... so what I do is to push the stuffing all the way to the bottom of the sock, grab the open end and swing the sock in the air round and round... I have often gotten the "what in the world are you doing?" look from my boyfriend when I'm doing this, but he's gotten used to it already. After that, I knead and roll the sock on a flat surface until round... and then the funny part comes - I pet it all over, rub it, and squish it until it looks perfect. (Sock babies really need a lot of tender loving care!!! Even in the making!)
 So Fortune Kitty turned out nice and round with my new-found method. I lucked out with my bucket-of-buttons with a single button that looked like a red ball of yarn. That turned out to be the "bell" for kitty's collar. Remember to save ribbons and bows, and any interesting buttons or bells... you never know when they will come in use!
Every sock baby is different... they all have just that one little thing different with each and every one, and it makes them unique. Even when I make the same dolls twice... their expression changes with a slight tilt of the head and a raise of the arm.. But one thing stays the same with all my sock babies... they are hand-made with lots of love, and loves to be hugged!

Every sock baby is different... they all have just that one little thing different with each and every one, and it makes them unique. Even when I make the same dolls twice... their expression changes with a slight tilt of the head and a raise of the arm.. But one thing stays the same with all my sock babies... they are hand-made with lots of love, and loves to be hugged!
Friday, December 3, 2010
Buttons etc.
Embellishments on a sock doll comes in different shapes, sizes, and of course, materials.. I'm going to talk a bit about buttons right now. Now how do you figure out what buttons you should use for each particular doll?
I don't believe that every button will fit each and every doll, as each doll is unique. So this also means you should have a wide variety of buttons. You don't have to buy those $5/set ones you find at Michael's or JoAnn's... do your research online. As I have mentioned in my previous post, purchasing a "bucket-of-buttons" is a great start. There are all sorts of styles of buttons made with different materials. I got my bucket on eBay.

Thursday, December 2, 2010
Now.... onto my second project...

Having a bunch of buttons to choose from is great.. considering you never know which to use for what occasion! I suggest getting those deals on a bucket-of-buttons... I managed to get quite a good selection of different types of colors and sizes.
The thing with making the pig, is to make it as bursting round as possible, without over-stretching the sock material. This is probably one of the easier dolls to make (as I was still in my practice phase). One important thing to watch out for is the proportion of the ears to the body. I have researched on piggy dolls which were made by other people, and they sorta look funny... The key to making sock dolls look beyond adorable is knowing which features to over-emphasize and exaggerate!!
Wednesday, December 1, 2010
How it all started...

So being the deal-seeker that I am, I found this book on Amazon for cheaper than Michaels, and got it there. From then on, I went on a mass online search for buttons, beads, eyes, and of course, poly-fil stuffing. And on September 26th, with my initial collection of socks I just bought and with the stuffing having arrived, I started on my very first doll... which also happened to be the birthday gift for my sister.

A wonderful new start to an accidental hobby. My mom always said that I wouldn't be able to complete a project like this, let alone have a hobby that I have to keep up with.. so a little ending message for my mom (if she ever reads this):
SEE! I CAN DO IT IF I REALLY ENJOY IT!
Monday, November 8, 2010
Taiwanese Cold Noodles 台式涼麵- RECIPE
Ok, so I've had several people ask me how to make Taiwanese Cold Noodles before.. but for some reason, I never got to giving it out. I know this got nothing to do with Sock Babies, but, you never know.. maybe Sock Babies like to eat too!
There are lots of variations to the exact recipe, and lots of debate whether or not it is made with sesame sauce or peanut sauce. My thought on this: sesame all the way! Don't get me wrong, peanut is great, but it shouldn't be the predominant taste. Always feel free to grind up some toasted peanuts or peanut powder to the sauce.. I'm sure it will be awfully tasty too! As far as I'm concerned, this tastes pretty much like the sauce I've had when I was little in Taiwan. So here you go... the recipe for Taiwanese Cold Noodles!
::INGREDIENTS::
Sauce
4TBS Sesame Paste
3TBS Soy Sauce
3TBS Sesame Oil
4TBS Hot Water (or Juices from steamed chicken)
2TBS Rice Vinegar
2TBS White Granulated Sugar
1Tsp Salt
1Tsp White Pepper
1TBS Minced Garlic

Noodles
1 Large Carrot
2 Small/Medium Chinese Cucumber or Persian Cucumber
2 Large Handfuls Chinese Bean Sprouts (about half a bag)
2 Halves Chicken Breast (de-boned, fat removed)
1 Bag Hong Kong Style Homemade Noodles (油麵)

::INSTRUCTIONS::
Sauce
::SERVE::
In a shallow bowl or deep dish, place noodles at the bottom, then put separately in the center the carrots, cucumbers, bean sprouts, chicken strips, with a bit of minced garlic on top. Use about 4-5TBS of sauce per person or as desired for taste.


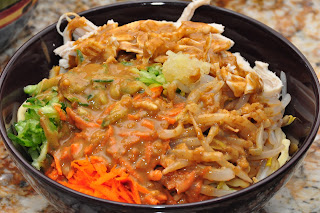
There are lots of variations to the exact recipe, and lots of debate whether or not it is made with sesame sauce or peanut sauce. My thought on this: sesame all the way! Don't get me wrong, peanut is great, but it shouldn't be the predominant taste. Always feel free to grind up some toasted peanuts or peanut powder to the sauce.. I'm sure it will be awfully tasty too! As far as I'm concerned, this tastes pretty much like the sauce I've had when I was little in Taiwan. So here you go... the recipe for Taiwanese Cold Noodles!
::INGREDIENTS::
Sauce
4TBS Sesame Paste
3TBS Soy Sauce
3TBS Sesame Oil
4TBS Hot Water (or Juices from steamed chicken)
2TBS Rice Vinegar
2TBS White Granulated Sugar
1Tsp Salt
1Tsp White Pepper
1TBS Minced Garlic

Noodles
1 Large Carrot
2 Small/Medium Chinese Cucumber or Persian Cucumber
2 Large Handfuls Chinese Bean Sprouts (about half a bag)
2 Halves Chicken Breast (de-boned, fat removed)
1 Bag Hong Kong Style Homemade Noodles (油麵)

::INSTRUCTIONS::
Sauce
- Combine all ingredients and mix until smooth.
- Add more sesame paste, rice vinegar, hot water, and/or minced garlic as needed to get to desired taste.
- Place the sauce into the refrigerator. The colder temperature will thicken the sauce.
Noodles
- Rinse all vegetables.
- Cut off the ends of the carrot and cucumbers.
- Peel the carrot and cut off any imperfections. There is no need to peel the cucumber.
- Using a metal grater, grate the carrot and cucumbers separately into thin strips. Put grated carrot and cucumbers into separate containers, cover, and place into refrigerator.
- Blanche the bean sprouts for 2-3 minutes. The bean sprouts should be softer, but still slightly crunchy to the bite. Drain, then rinse with cold water. Drain again, put cooled bean sprouts into a container, cover, and place into refrigerator.
- Steam the two chicken breast halves until just cooked. Make sure you do not over steam the chicken breasts or else the meat will become dry.
- Once the chicken breasts are steam-cooked, let it cool 5-10 minutes, or until you can handle the chickent with your bare hands.
- Using your fingers, peel chicken into thin strips. You may cut the chicken into strips if you like, however, I find the peeled thin strips mix better. Put peeled chicken strips into a container, cover, and place into refrigerator.
- Boil noodles for 3 minutes. Drain, then rinse with cold water. Drain again, put noodles into a container, cover, and place into refrigerator.


::SERVE::
In a shallow bowl or deep dish, place noodles at the bottom, then put separately in the center the carrots, cucumbers, bean sprouts, chicken strips, with a bit of minced garlic on top. Use about 4-5TBS of sauce per person or as desired for taste.


ENJOY!
Saturday, November 6, 2010
Still Working.. Still Under Construction...
My last several orders consists of 7 dolls.. So I'm just busy working on those before I can start working more and posting pictures here. Hang in there.. I'm on my way!
Subscribe to:
Posts (Atom)